
The Data Capture page is a versatile transaction entry module designed for recording various manual financial movements across the system. It supports both Customer Ledger and General Ledger (GL) accounts, allowing staff to post debits and credits, manage multi-item batches, and enforce physical cash verification for cash-based
accounts.
PURPOSE
- Provide a unified interface for manual transaction entries (debits and credits).
- Enable discovery of accounts regardless of type (Customer vs. GL).
- Enforce strict accounting balance (Total Debit must equal Total Credit) for multi-item batches.
- Safeguard against insufficient funds by automatically checking customer account balances before debits.
- Mandate physical currency breakdowns via the Cash Denomination modal when cash-based accounts are involved.
STEP-BY-STEP GUIDE
Step 1 — Start the Session
- Navigate to the Teller Module or Back Office Module and select Data Capture page.
- Click the New button in the bottom action bar to clear any old session data and initialize a fresh Batch ID and Transaction Date.

Step 2 — Find and Select an Account
- Click the blue Find A/C button.
- In the popup modal:
- Select either Customer Account or General Ledger Account.
- Type the name or account number in the Search box.
- Click the Action button next to the correct result.
- The Account No., Account Name, and current Account Balance will automatically populate the main form.
Step 3 — Enter Transaction Details
- Amount: Enter the value of the transaction.
- Entry Type: Select Debit (taking funds) or Credit (adding funds).
- Description: Provide a clear reason for the entry (e.g., “Manual correction for service fee”). This field is mandatory.
Step 4 — Save and (Conditional) Cash Count (Anti-Fraud Check)
- Click the green Save button.
- The “Cash Check”:
- If you selected a standard account, the item is saved to the batch immediately.
- If the account is a Cash Account, the system will automatically trigger the Cash Denominations window. You must enter the physical breakdown of notes and coins matching your entered amount. Click Save [F6] in the popup to finalize.
- Once saved, a Voucher No. and Transaction No. are generated, and the item appear in the Transaction History table at the bottom.
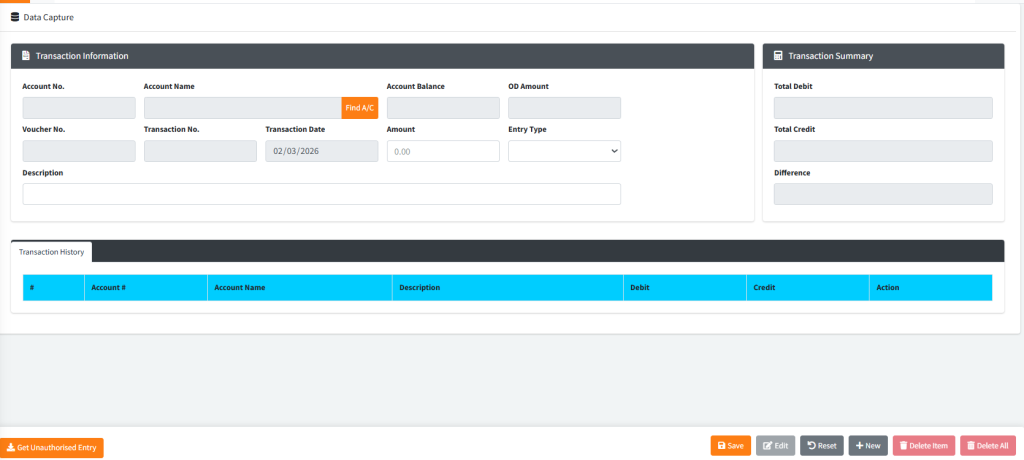
Step 5 — Balancing the Batch
- A batch is considered “unbalanced” if the Difference in the summary box is not
0.00. - Continue adding as many items to the batch as needed until the Total Debit matches the Total Credit.
Step 6 — Managing Entries
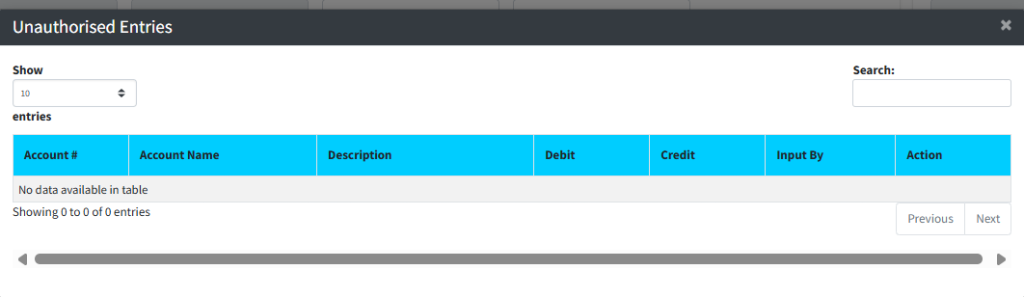
- Recall Entries: Click Get Unauthorised Entry to search for and select pending transactions from the list.

- Edit/Delete: To modify an item in the current batch, select it from the Transaction History table, click Edit to unlock the fields, make changes, and click Save. To remove a single item, use Delete Item.
KEY NOTES
- Insufficient Balance: The system will block any Debit attempt on a customer account if the amount exceeds their current balance.
- Persistent Batching: The system remembers your current Voucher Number during a session, allowing you to build complex multi-leg transactions easily.
- Live Summary: Always watch the Transaction Summary box (right side) to track your progress toward a zero difference.