The Mobile Bankers Register is a specialized human resources and administrative module used to manage field agents (Mobilizers) responsible for daily remote cash collection and customer boarding. This system not only stores the agent’s biographical data but also handles their mobile application credentials, performance targets, the specific General Ledger control accounts linked to their daily collections, and mandatory guarantor data.
PURPOSE
- To register field agents and grant them secure, verifiable access to the mobile boarding and collection application.
- To link an agent directly to a designated vault/mobilization General Ledger account to track daily cash transit.
- To define and monitor Key Performance Indicators (KPIs), such as monthly target amounts and target account creation volumes.
- To maintain strict compliance by securely logging profile images and mandatory guarantor information before an agent can become fully active or be updated.
STEP-BY-STEP GUIDE
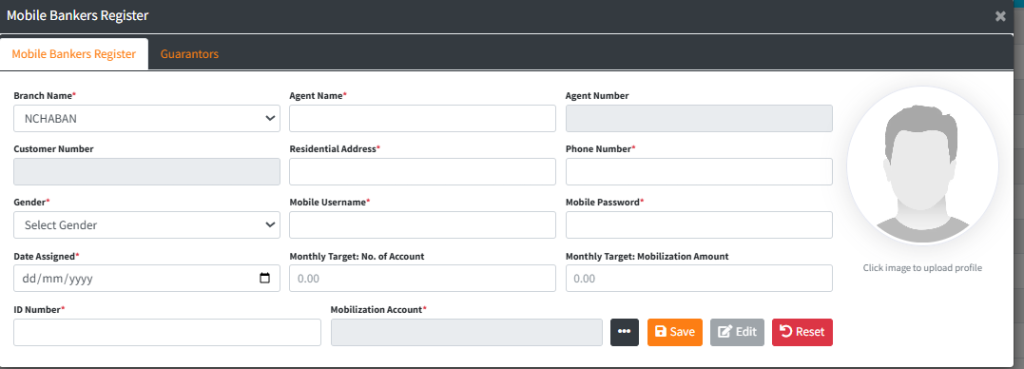
1. Registering a New Mobile Banker
- Navigate to the Mobile Bankers administrative dashboard.
- Click the primary Add Mobile Banker button. This opens the comprehensive integration modal.
- On the Mobile Bankers Register tab, provide the following operational details:
- Branch Setting: Select the branch the agent will operate under.
- Personal Info: Enter the Agent Name, Residential Address, Phone Number, Gender, and ID Number.
- Mobile Access: Set the Mobile Username and Mobile Password. This is what the agent will use to log into the mobile app in the field.
- Operational Directives: Enter the Date Assigned and the agent’s KPIs (Monthly Target: No. of Account and Monthly Target: Mobilization Amount).
- Account Mapping: Under Mobilization Account, click the lookup button to open the General Ledger finder and select the specific Mobilizer Control Account where this agent’s funds will legally rest during transit.
- Profile Picture: Click the placeholder image slot on the right side to upload a clear profile photo of the agent.
- Click Save to lock in the agent’s profile.
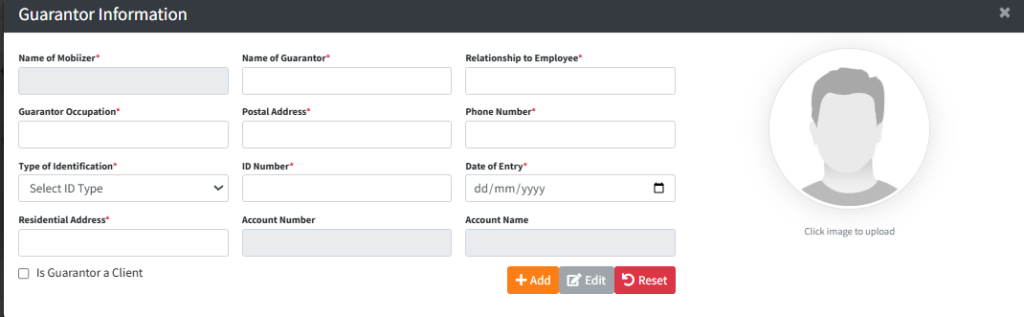
2. Managing Guarantor Information (Compliance)
Important: The system enforces that an agent must have at least one assigned guarantor before their existing profile can be significantly updated.
- In the agent’s registration modal, navigate to the Guarantors tab.

- Click Add Guarantor to open the Guarantor integration form.
- Is Guarantor a Client?
- If the guarantor is already a customer of the institution, check the Is Guarantor a Client box. A Find Customer button will appear. Use this to search your database, and the system will automatically pull in their name, phone, address, ID details, and their existing banking profile picture.
- If they are not a client, manually fill out the required background information (Name, Occupation, ID Type, Phone, etc.).
- Add the guarantor’s profile picture by clicking the right-side image block.
- Click Add to save the guarantor to the agent’s profile.
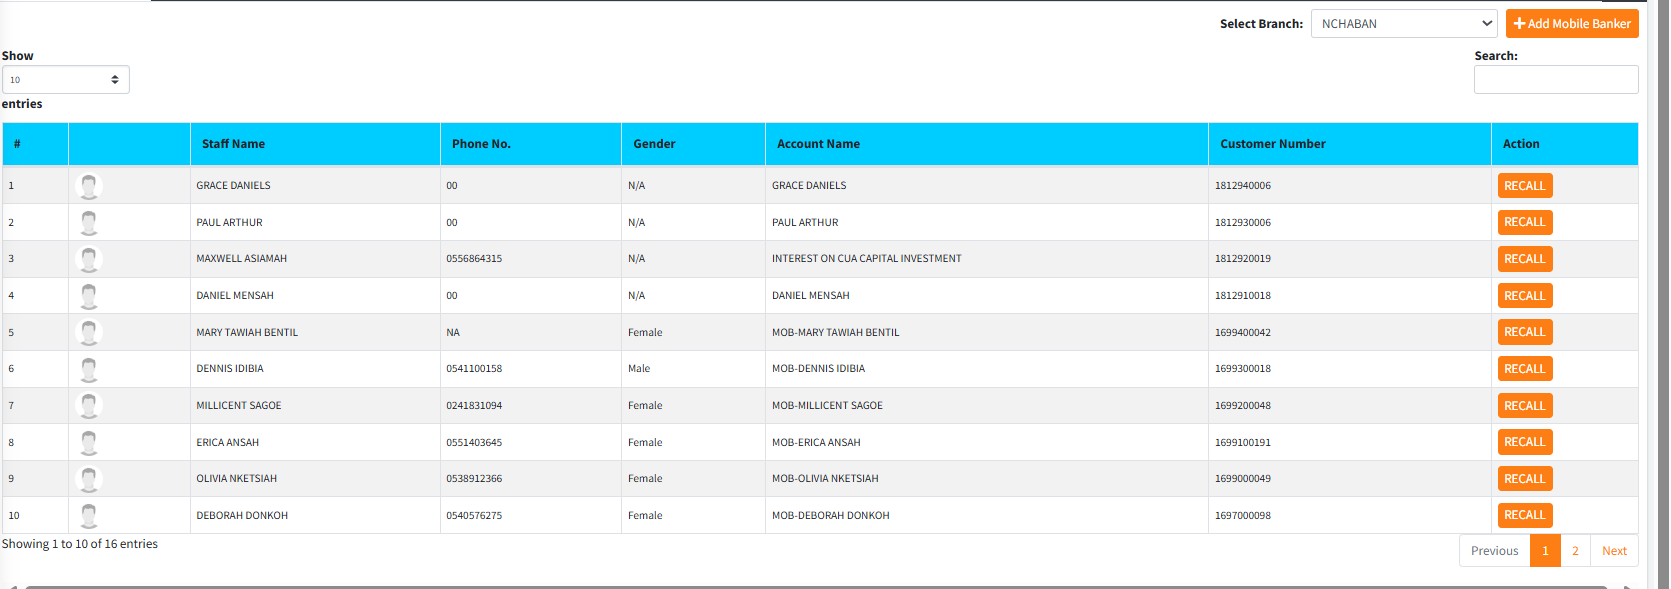
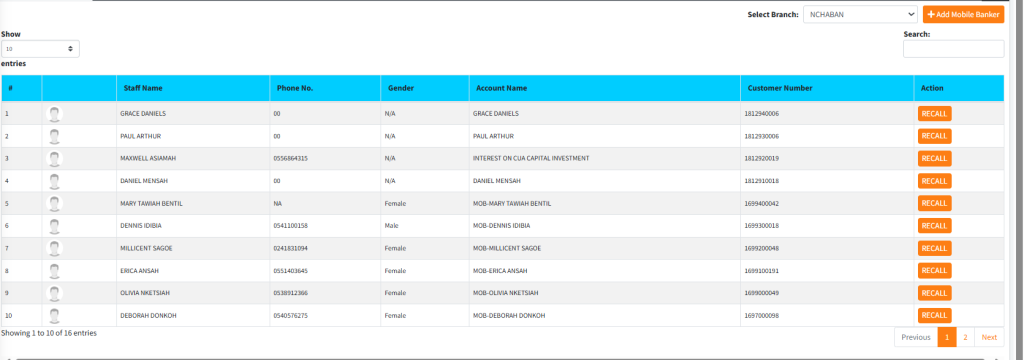
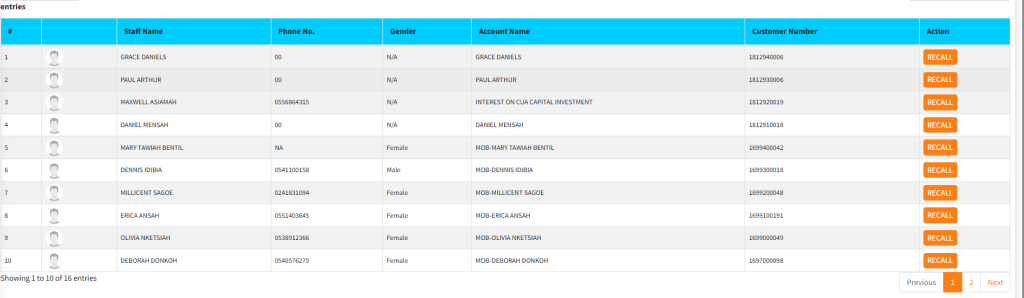
3. Recalling and Editing Profiles
- On the main dashboard table, use the Select Branch filter to narrow down the agent list if needed.
- Locate the agent and click the blue RECALL button next to their name.
- This opens the modal with their pre-loaded data in a locked (disabled) state.
- To make changes, click the Edit button at the bottom of the form to unlock the fields.
- Apply necessary updates, then click Save.
KEY NOTES
- Unique Credentials: Ensure the Mobile Username is unique system-wide to prevent login collisions on the mobile application.
- Guarantor Enforcement: If you attempt to process an update on a Mobile Banker who does not currently have guarantor data filed, the system will actively block the save and prompt you to supply guarantor details first.
- Client Guarantors: Utilizing the “Is Guarantor a Client” tool ensures data consistency and allows you to lean on previously KYC-verified data.