The Stationary Registry page provides a unified dashboard and process flow for managing the intake and outtake of the institution’s physical stationary stocks (e.g., passbooks, deposit books, checkbooks). Using a robust modal interface, it enables users to seamlessly log new stationary stock entries into a defined GL inventory account, or record the sale/issuance of these items, instantly calculating totals and maintaining an active ledger.
PURPOSE
- Manage both the receiving and selling of bulk physical stationary assets within the branch.
- Standardize the method of binding new stationary items to specific General Ledger Income and Stock accounts.
- Ensure that the total value of stationary issues is automatically calculated to prevent data entry discrepancies.
- Provide a clean, unified dashboard to view, audit, and update past stationary transactions.
STEP-BY-STEP GUIDE
Step 1 — Accessing the Module
- Navigate to the Back Office Module and locate the Stationary Register Page.
- Click on Stationary Registry to open the main dashboard.
- The dashboard displays a table of existing stationary transactions.

Step 2 — Setting up a New Stationary Item (If the stationary item you wish to register does not yet exist in the system, you must configure it first).
- Click the orange Add Stationary Registry button at the top right of the dashboard.

- In the “Stationary Item Details” section, click the dark options button (
...) next to the Stationary Item dropdown. This opens the Stationary Item Setup overlay.

- Under Stationary Item Information:
- Enter the name of the new item in the Stationary Item text box (e.g., “Standard Savings Passbook”).
- Define the default Unit Price for the item.
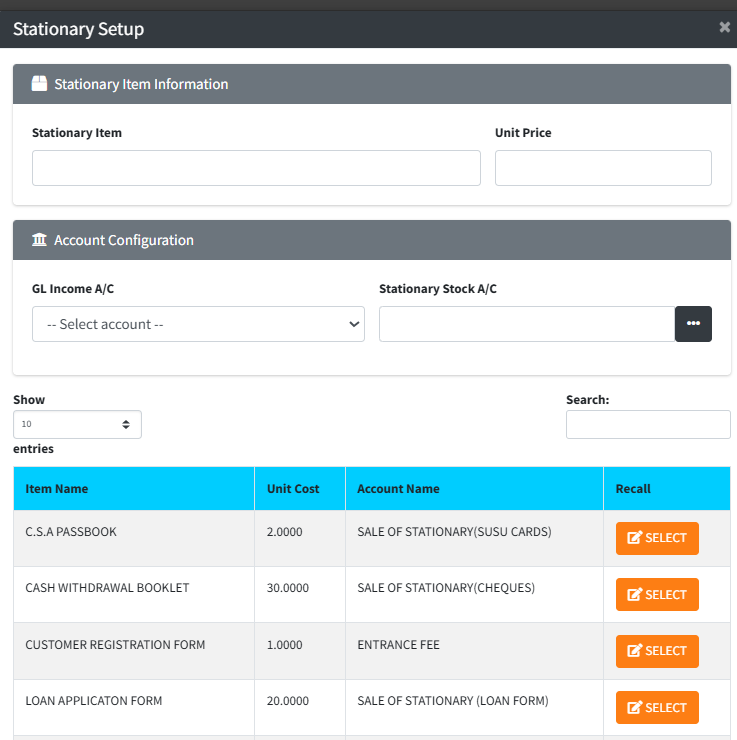
- Under Account Configuration:
- Select the correct GL Income A/C from the dropdown list. This account will register revenue generated from sales.
- For the Stationary Stock A/C, click the dark options button (
...) to open the ‘Find Account’ overlay and bind the correct inventory control GL account.
- Click the blue Save button at the bottom of the overlay to register the new item. You can now close this overlay.
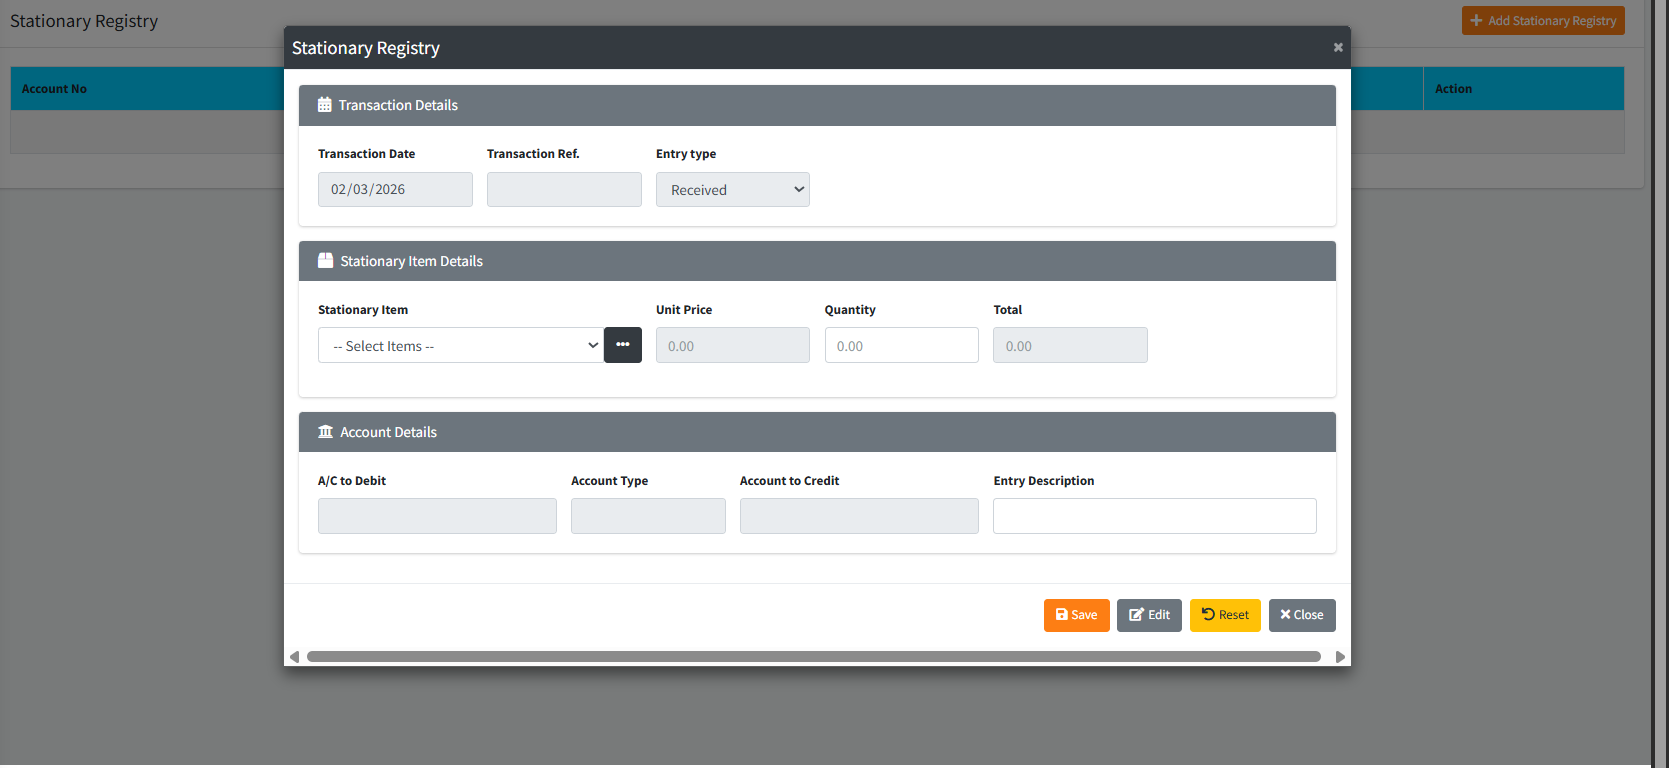
Step 3 — Processing a Stationary Registry Entry (Sales/Received)
- On the main dashboard, click the orange Add Stationary Registry button to open the main processing modal.
- Under the Transaction Details section:
- The Transaction Date prepopulates with today’s date.
- Choose the Entry Type from the dropdown: “Received” (adding stock) or “Sales” (issuing to a customer).
- Under the Stationary Item Details section:
- Select the desired product from the Stationary Item dropdown.
- The Unit Price field will automatically populate based on the item selected.
- Enter the Quantity. The system will automatically calculate and display the Total cost.
- Under the Account Details section:
- Verify the prepopulated A/C to Debit and Account to Credit fields based on the teller logged in and the item configured.
- Type a clear reason for the transaction in the Entry Description box (e.g., “Issuance of 5 passbooks to branch A”).
- Click the primary Save button. Confirm the prompt to authorize the transaction. A success message will appear and the table will update.

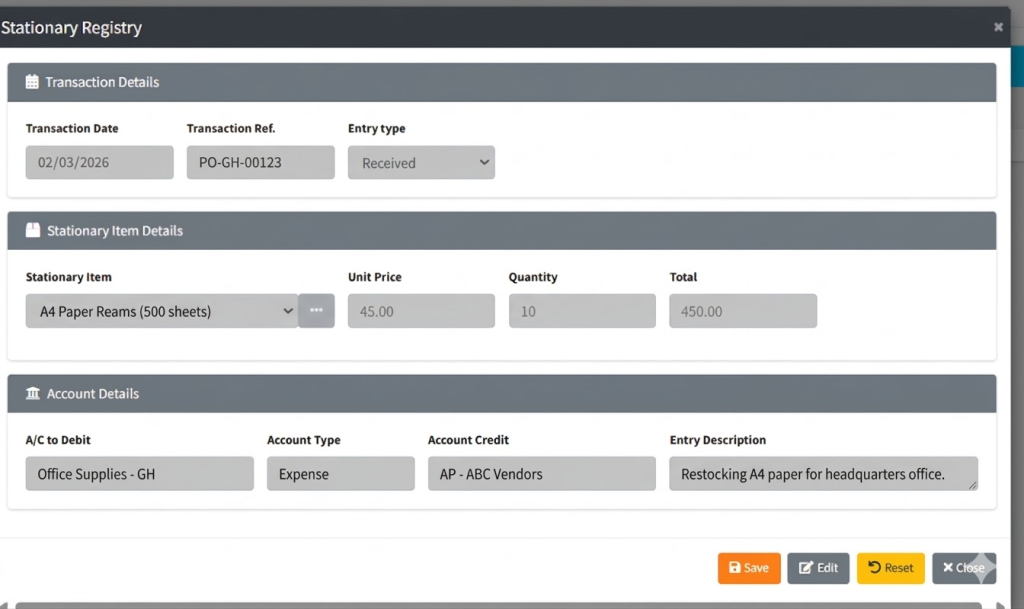
Step 4 — Editing an Existing Registry Entry
- To modify or review an entry, locate it in the main dashboard table and click the blue SELECT button.
- The modal will emerge, populated with the transaction’s existing data in read-only mode.
- To unlock the fields, click the grey Edit button at the bottom of the modal.
- The Quantity and Entry Description fields will become editable. Adjust the values as necessary.
- Click the light blue Update button (which replaces the Save button) to commit your changes.
KEY NOTES
- Auto-Calculations: The “Total” block in the main processing modal is locked and completely dependent on the “Quantity” and “Unit Price”, preventing mathematical errors.
- Nested Overlays: The system utilizes nested modals. When mapping a new item to an inventory account (Stationary Stock A/C), a secondary lookup modal is triggered above the setup screen. Be sure to return directly to the main setup screen to save.
- State Locks: For safety, when a previous record is selected for review, the inputs are completely disabled. Providing a barrier against accidental edits without specifically clicking the grey Edit button.