The Shares Withdrawal module allows administration to formalize and process the withdrawal or liquidation of a member’s shares. Due to the sensitive nature of share liquidation in cooperative frameworks, this page calculates the maximum available share balances, compares them against any outstanding loan/savings balances, and safely applies necessary processing commissions to a specified general ledger account before finalizing the withdrawal.
PURPOSE
- Provide a secure workflow for liquidating “Member Shares” or “House Shares”.
- Automatically retrieve and calculate real-time member Shares Balances alongside Savings Balances.
- Ensure any administrative withdrawal fees or percentages are accurately calculated and routed to a specific General Ledger Commission Account.
- Standardize the audit trail by assigning an automatically generated transaction number to every withdrawal.
STEP-BY-STEP GUIDE
Step 1 — Accessing the Module and Dashboard
- Navigate to the Back Office Module and access Shares Withdrawal page.
- The primary screen acts as a ledger viewing dashboard, displaying a table of all historically processed share withdrawals, complete with the calculated charge amounts and assigned GL accounts.

Step 2 — Initiating a New Withdrawal
- Click the orange Add Shares Withdrawn button located at the top right of the data table.

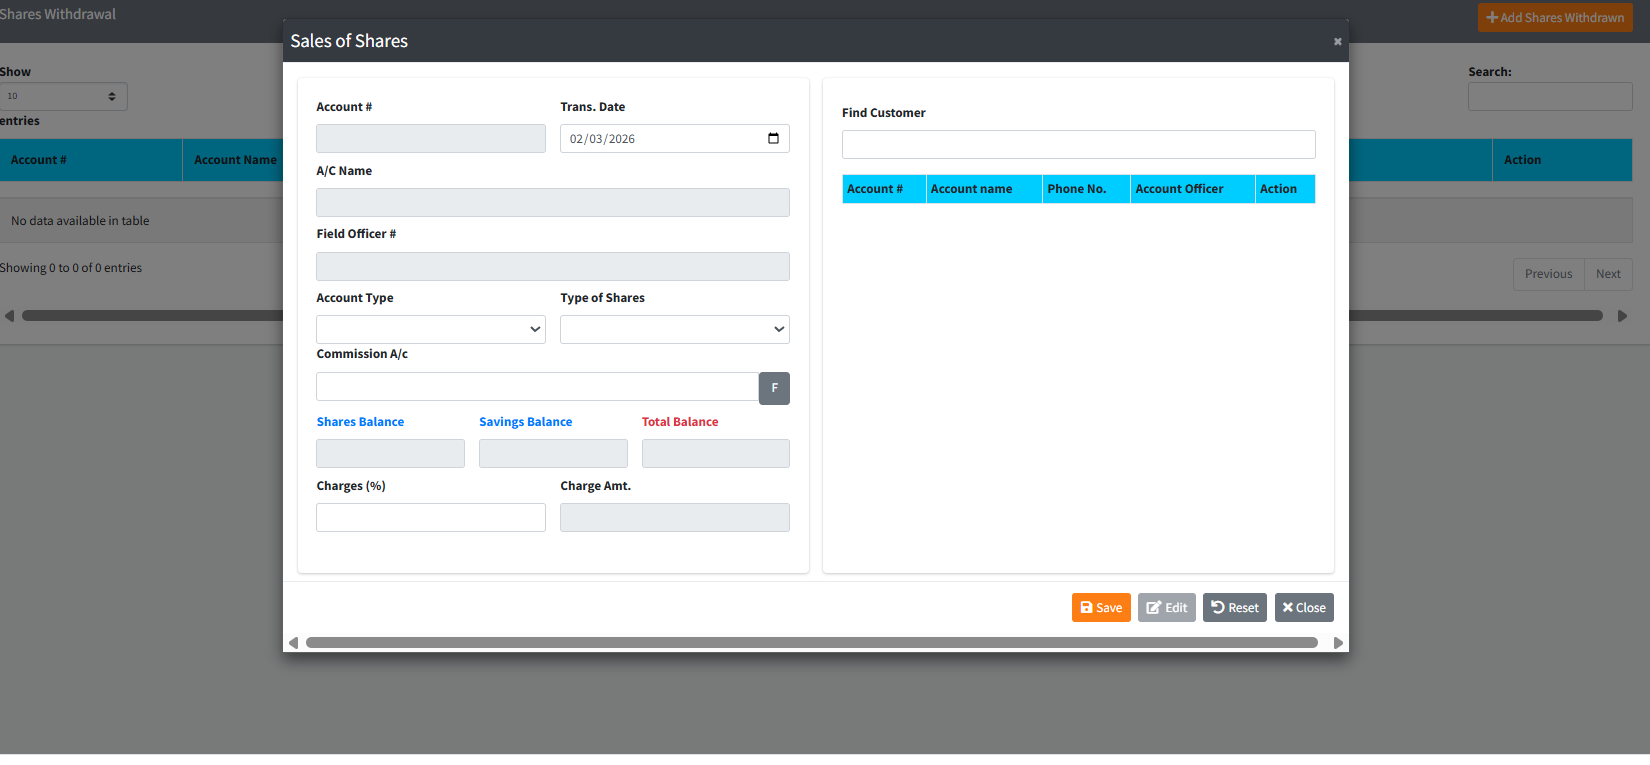
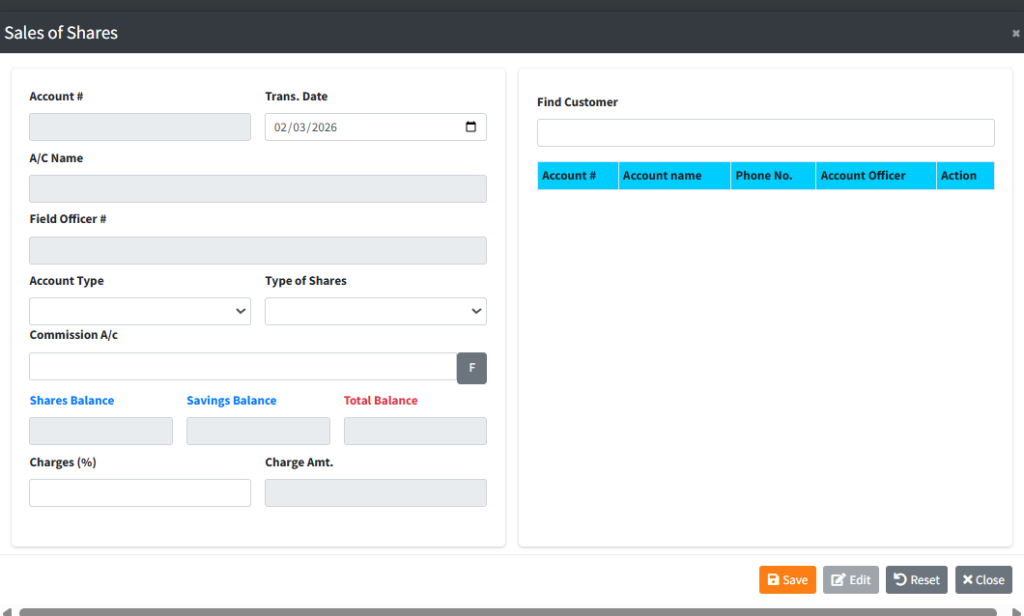
- A large modal titled Sales of Shares will appear. This modal is split into two working sides: the left side handles the transaction metrics, and the right side handles customer lookup.
Step 3 — Locating the Member Focus on the Right Side (Find Customer) panel first:
- In the Find Customer text box, type the member’s name, ID, or account number. The system will auto-search as you type.
- Review the generated table results and locate the correct member.
- Click the blue RECALL button next to their name.
- The system will now automatically fill out the member’s details on the left side of the screen, including pulling their total “Shares Balance” and “Savings Balance”, and unlocking their associated products.
Step 4 — Configuring the Withdrawal Details Focus on the Left Side panel:
- Trans. Date: Verify this is set to the correct withdrawal date (it defaults to today).
- Account Type: Select the specific destination product or account related to the withdrawal layout.
- Type of Shares: Choose whether you are liquidating Member Shares or House Shares.
- Charges (%): If the institution applies a penalty or administrative fee for withdrawing shares, enter the percentage here (e.g.,
5). The system will automatically compute the Charge Amt based on the balances. - Commission A/c: If a charge is applied, you MUST specify where that fee goes. Click the grey F button next to the Commission A/c field to open the General Ledger lookup modal. Search for your internal Income/Commission GL account and select RECALL to bind it.
Step 5 — Saving and Finalization
- Review the calculated Total Balance, verify the extracted Charge Amt, and ensure the member data is completely accurate.
- Click the orange Save button at the footer of the modal.
- Aesthetically review the confirmation prompts, wait for the transaction number to generate under the hood, and confirm to append the withdrawal officially to the ledger.
KEY NOTES
- Smart Charge Calculation: The system utilizes a smart percentage handler. If the member’s SavingsBalance is negative (they are in deficit), the percentage fee is drawn purely against the
SharesBalance. Otherwise, it calculates against the Total Balance. - Mandatory Commission Routing: You cannot process a withdrawal with a
Charges (%)greater than0if you do not attach a valid Commission A/c. - Nested Search Modals: Using the “F” button for the Commission account will pop up a second search table overlapping the first. Selecting your GL account there returns you safely to your withdrawal form.
- Insufficient Shares: The module features a hard lock. If the retrieved
SharesBalanceis 0 or less, the UI will prohibit the withdrawal from saving.